What I’m bringing to the sky
| Setup | Planned role |
|---|---|
| Seestar S50 | Smart-telescope imaging |
| Seestar S30 Pro | A second smart-telescope imaging setup |
| WideSky | My primary traditional imaging rig, using the FMA135 and astro-modified Nikon D5300 |
| WiNG | My secondary traditional imaging rig, built around the William Optics Z61 |
| PiNG — optional | Visual observing while the imaging rigs work |
| Insta360 | Recording the entire setup, followed by whole-sky timelapse at night |
| Secondary iPhone 15 Pro | A separate, fixed-view timelapse |
WideSky and WiNG are both fully operational, and WideSky’s recent camera astro-modification was successful. The core plan is four imaging telescopes and two timelapse cameras; PiNG is an optional addition for looking through an eyepiece.
Quality-of-life options
A few small additions should make the camp easier to use over several days.
| Addition | How I plan to use it |
|---|---|
| Gaffer-tape compass on the tarp | Once the tarp is positioned, I’ll mark the actual directions with glow-in-the-dark gaffer tape to make rough instrument orientation and alignment easier. Final mount alignment still happens separately. |
| Small red cones with dim red electric tea lights | I’ll mark cable routes and other trip hazards so I can move around more easily after dark, keeping the markers dim enough for the observing environment. |
| Single-cup Keurig | Coffee or hot chocolate will be a welcome comfort, provided appliance use is permitted and suitable power is available. |
| Inflatable mattress in the tent | The mattress already fits. I’ll pair it with suitable insulation and bedding, and rehearse inflation and overnight comfort before departure. |
| Laptop and portable hard drives | I’ll back up images and timelapse footage during the trip. I’m not planning active post-processing in camp; the laptop’s main job is to help me organize, copy, and check the data before processing at home. |
Pre-trip checklist
- ☐ Full camping dry run in the backyard. I’ll set up the complete camp, including the tent, bedding, table, power, telescopes, and both timelapse cameras. I want to rehearse an overnight stay and the full pack-down, not just test the imaging rigs.
- ☐ Rehearse the heading-based telescope layout. I’ll try S30 Pro, S50, WideSky, and WiNG from west to east, then choose spacing and any stagger based on aperture heights and full moving footprints. I’ll test low west/northwest clearance for NGC6820, shared southeastern sightlines, and the northeast tent roofline from WiNG and the other rigs.
- ☐ Plan to cover or red-shield the car lights. I’ll identify the interior and exterior lights that come on when I unlock the car, open doors or the trunk, and access equipment. Before departure, I’ll test how to disable, cover, or red-shield them so routine access after dark won’t light up the field.
- ☐ Consider an inexpensive canopy or shade for daytime telescope cover. I’ll compare a simple canopy or shade option for the rigs between sessions, checking its footprint, anchoring, wind limits, ventilation, and whether it is permitted on the observing field before deciding to bring one.
Rehearse the whole camp
I’ll rehearse with the actual equipment, cables, shelter, and cameras I intend to pack. That means practicing the full arrival sequence, running the setups together after dark, and packing everything away again. I want to test the practical details as a complete system: stable footing, dew control, power, network connections, camera storage, and the space I need to move around.
I’ll pack in deployment order. The Insta360 and its starting power come out first, followed by the main power line, tarp, stakes, and mallet. Instrument kits will stay together, with their cables and accessories labeled. I’ll also prepare imaging plans and calibration files for the configurations I’m actually bringing, with essential information available offline.
An indoor lighting check
During the indoor tent setup, I placed a red light inside, shining straight up. The photograph shows a strong red glow through the fabric, especially across the roof and upper walls. That gives me something specific to investigate during the backyard rehearsal: how the brightness and direction of the light affect the tent’s visibility from outside.
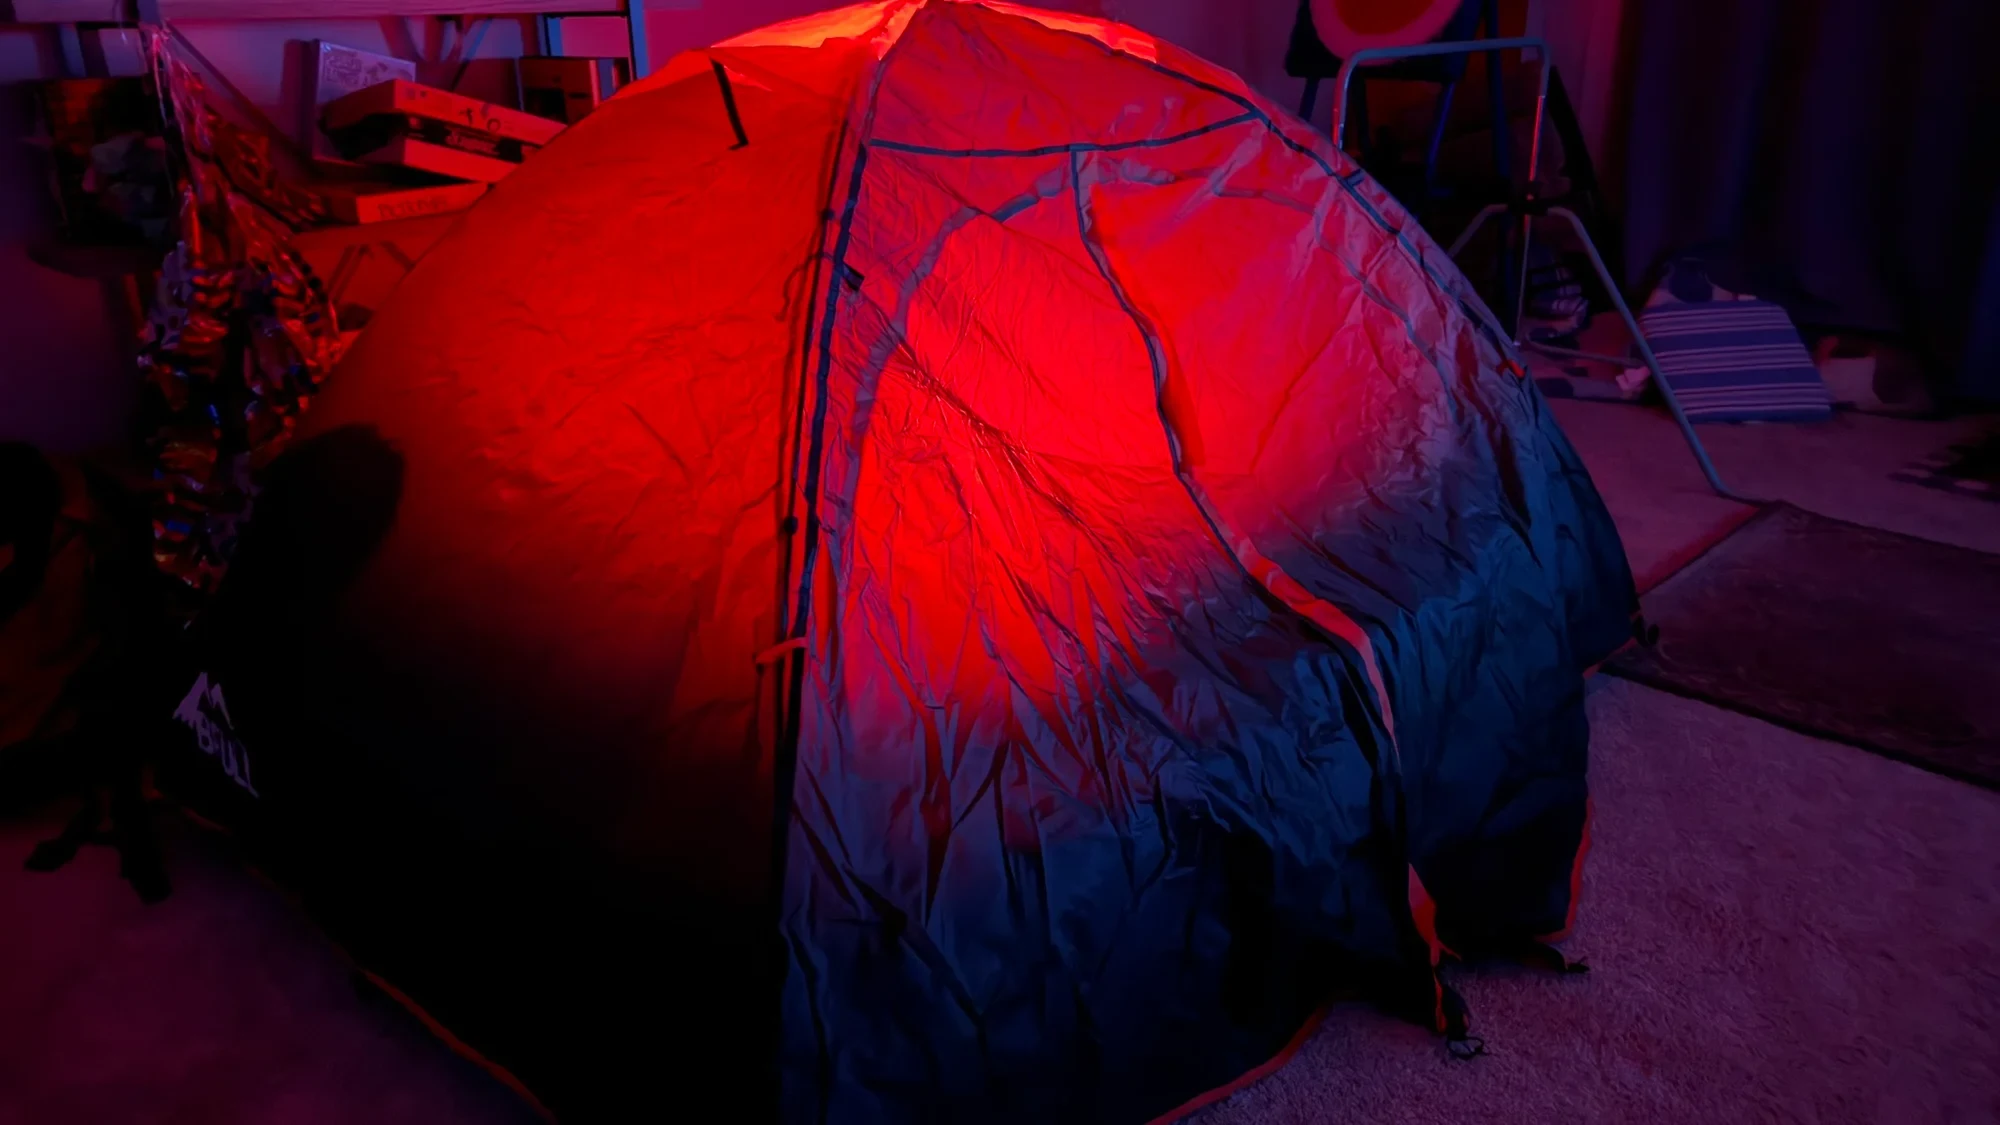
An indoor setup check with a red light pointing straight up inside the tent. This photograph records that arrangement; outdoor light containment still needs testing.
I’ll try dimmer, downward-directed light for tasks inside the tent, then check the result outdoors from neighboring observing positions. I’ll include screens and opening the tent door in that check, so I’m testing how I’ll actually use the shelter after dark.
From arrival to pack-down
| Step | The plan | |||||||||||||||
|---|---|---|---|---|---|---|---|---|---|---|---|---|---|---|---|---|
| Step 0Start the Insta360 recording | Before any site setup begins, I’ll position the Insta360 and confirm that it is recording. Its mount, charged starting power, and available storage will be accessible without unpacking the rest of the vehicle or establishing site power or internet. This recording is part of the trip: I want to show how the observing camp comes together, including the ordinary work that happens before the first exposure. | |||||||||||||||
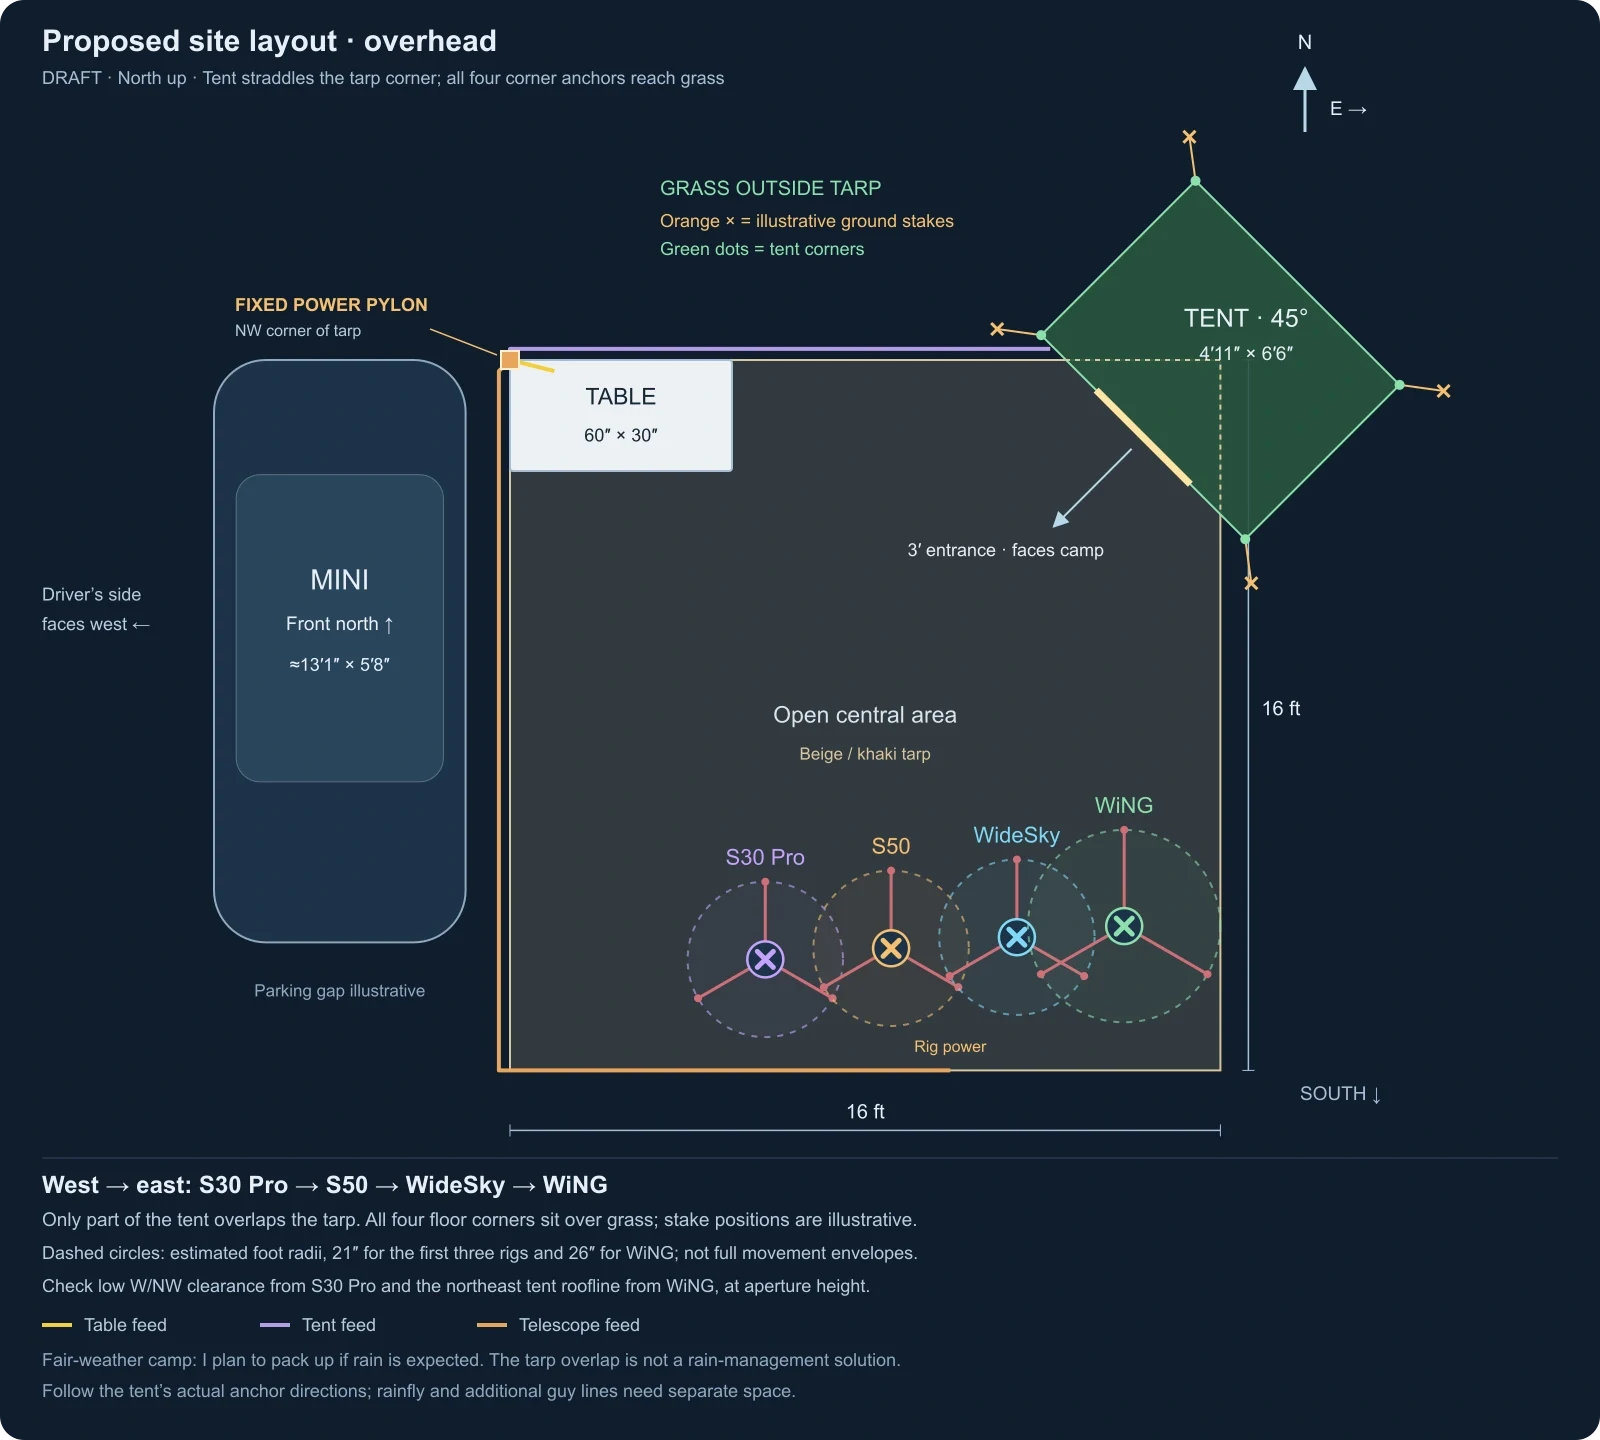
| Step 1Choose the site and map the footprint | With the camera running, I’ll choose the working footprint around the available sky, ground conditions, and power access. I’ll reserve space for the tent, table, four imaging rigs, and both timelapse viewpoints, with clear walking lanes between them. My current proposed telescope order is S30 Pro → S50 → WideSky → WiNG, from west to east. This puts S30 Pro at the western edge and WiNG at the eastern edge. The schedule’s pointing directions now guide the order; actual mounted heights and moving clearance will determine spacing and any north–south stagger during rehearsal. The Subject Plan direction charts suggest the following distribution. These are telescope-hours weighted for the currently assigned nights: WideSky and WiNG twice, each S30 Pro program once, and S50’s broadband program once. Eastern and western compass sectors are grouped separately; the north and south sectors are excluded from these columns.
S30 Pro has the strongest need for a clear western opening: its narrowband program spends about 2.3 hours below 30° toward the west, largely because of NGC6820. That target’s current 11:40 PM–2:30 AM slot descends from roughly 36° to 5° altitude toward the west/northwest. WiNG’s strong eastern preference supports placing it at the other end. The middle pair is less decisive; S50 followed by WideSky is a starting arrangement to test, not a validated placement. I’ll position the tent diagonally across the tarp’s northeast corner, with all four floor corners over grass for staking and the centered entrance facing southwest onto the tarp. Only part of the tent floor overlaps the tarp, leaving more open camp space while preserving the low west/northwest sightline. Northeast is not automatically clear: WiNG spends substantial time NNE/NE, and some eastern observations fall below 30°. I’ll check the tent roofline from each telescope’s aperture height, especially WiNG at the eastern end, including guy lines and the tent’s complete footprint. The 25° warning ring in the 3D chart is a planning reference, not a measured obstruction boundary. The charts treat the rigs as sharing one location, so the actual offsets must be checked on site. I’ll preserve eastern, southeastern, southern, and low west/northwest sightlines while testing tube, counterweight, and cable travel through tracking and meridian flips. Repeat-night weights reuse the reference-night positions; the second night and S50’s pending narrowband plan may change this balance.
Proposed site layout with the table northwest and tent rotated 45° across the northeast tarp corner. Green dots mark tent corners over grass; orange crosses show illustrative stake positions, with the three-foot entrance opening onto the tarp. The nominal 16-by-16-foot tarp, tent, and table are drawn to their stated dimensions; tripod footprints, spacing, stagger, and parking clearance remain estimates for rehearsal. Dashed circles show estimated tripod foot radii, not full telescope movement envelopes. The tarp sits southeast of the fixed power pylon: the table has a short local feed, the tent feed runs east along the north edge, and the telescope feed runs south along the west edge beside the car, then east along the south edge. Final cable routing and sightlines still need checking on site. I’ll allow for the full movement of each telescope, the tent’s guy lines, and access to the equipment after dark. If PiNG comes along, it will have a visual-observing position where using it won’t disturb the imaging setups. | |||||||||||||||
| Step 2Run the main site power line | I’ll route the main power line to the site’s distribution point, keeping it around the working area where practical. I’ll unwind the cable reel according to its instructions, check the connections, and arrange protection for the distribution hardware. The first red cones will go down as the cable route takes shape. I’ll add the dim electric tea lights for nighttime visibility later. | |||||||||||||||
| Step 3Position and secure the tarp | I’ll place the tarp to suit the site layout, then secure it with stakes and the mallet. I’ll keep its edges tidy and check for loose material that could flap, catch a foot, or interfere with stable telescope footing. The tarp’s position comes first. I’ll apply the glow-in-the-dark gaffer-tape compass to match the site after the tarp is in its final position. | |||||||||||||||
| Step 4Establish directions and tape out the compass | Before surrounding the area with mounts and equipment, I’ll establish the sky directions and use glow-in-the-dark gaffer tape to mark a compass reference on the positioned tarp. That gives me a common orientation reference as I set out the rigs; each mount will still receive its own final alignment. I’ll test the tape on a small area of the tarp before the trip, checking adhesion, removal, and how its glow looks after dark. Once the directions are marked, I can continue with the network, tent, and table. I’ll cover any glow that would interfere with the observing environment. | |||||||||||||||
| Step 5Bring up internet and the local network | I’ll power the T-Mobile 5G Wi-Fi hotspot and check the connections I need for control and monitoring. T-Mobile reception was adequate during my daytime visit; this setup check will confirm the hotspot and the devices working together. Once those are running, I can continue assembling the site. I’ll have my local-control and offline arrangements ready as well, so the physical setup and observing plan don’t depend on good cellular reception. | |||||||||||||||
| Step 6Pitch the tent | Next I’ll pitch and secure the tent diagonally across the northeast tarp corner, using its stakes and the mallet. I’ll check that all four corner anchors reach grass, follow the tent’s actual anchoring directions, and allow room for the rainfly and full guy-line footprint. The centered entrance will face southwest onto the tarp, clear of telescope positions and cable routes. This is a fair-weather setup: I plan to pack up if rain is expected; the partial tarp overlap is not a solution for keeping rainwater from collecting beneath the tent. The tent will be my place to rest and warm up. I’ll inflate the mattress, arrange its insulation and bedding before darkness, and check that lights and screens inside don’t turn the shelter into a bright lantern for neighboring observers. | |||||||||||||||
| Step 7Set out the table and chair | The folding table will become my control and organization area, with a chair for monitoring sessions and taking breaks. I’ll give small accessories a consistent home so I can find them without searching through cases at night. Food and drinks will have a separate area, away from optics, electronics, and open equipment boxes. | |||||||||||||||
| Step 8Place pavers, vibration pads, and ballast | I’ll position the pavers, vibration pads, and ballast in the arrangement tested during rehearsal. This is the time to finish carrying and adjusting the heavy support pieces. I’ll check that walking nearby or moving the tarp doesn’t disturb the instrument footing, and that the support hardware leaves the walking lanes clear. | |||||||||||||||
| Step 9Set up tripods and mounts | With the support positions established, I’ll assemble the tripods and mounts, check their stability, and roughly orient them. I’ll leave enough clearance for telescope movement and for reaching controls and connections. I’ll use the rehearsed west-to-east order of S30 Pro, S50, WideSky, and WiNG, allowing room for tubes, cameras, counterweights, and cables throughout tracking and any meridian flips. Once mounted, I’ll recheck the eastern, southeastern, southern, and low west/northwest sightlines at each telescope’s aperture height, along with the tent roofline to the northeast. This settles the physical layout before I unpack the instruments. | |||||||||||||||
| Step 10Place instrument power boxes and branch cables | I’ll put each instrument’s power box beside its assigned setup and run the labeled branch cables. I’ll leave the slack needed for movement, protect connections, and keep cables out of the walking lanes wherever possible. I’ll add red cones at any remaining cable hazards as I go, so the markers reflect the actual finished routes. | |||||||||||||||
| Step 11Deploy the telescopes | I’ll deploy the S50, S30 Pro, WideSky, and WiNG, bringing them online one at a time. For each setup, I’ll check its power, device connections, camera or controller, and dew-control equipment before moving on. If I bring PiNG, I’ll set it up for visual observing once the four imaging rigs are in place. It will give me a way to spend time at the eyepiece while the cameras collect data. | |||||||||||||||
| Step 12Prepare both nighttime timelapses | The Insta360 will already have captured the setup. Before its nighttime session, I’ll save the setup footage, check remaining power and storage, and verify the whole-sky composition and recording settings. I’ll also position the secondary iPhone 15 Pro for its own fixed timelapse, connect its power, and make a short test recording. The cameras can have different viewpoints: one for the wider sky, the other for a consistent view of the night unfolding around the camp. | |||||||||||||||
| Step 13Finish the camp before dark | I’ll walk the entire footprint, checking tarp edges, guy lines, cable slack, telescope clearance, and access to power boxes. Loose cases will be put away, bedding will be ready, and warm layers, water, snacks, and my red-mode headlamp will be within reach. As daylight fades, I’ll illuminate the cable-hazard cones with dim red electric tea lights and check them from outside my own site. I’ll also check screens, camera indicators, tent lighting, and vehicle lights so the camp stays unobtrusive after dark. | |||||||||||||||
| Step 14Commission the rigs at dusk | At dusk, I’ll complete the alignment, focus, framing, and guiding checks appropriate to each instrument. I’ll inspect initial exposures and confirm that tracking, dew control, and image storage are working as intended before committing to longer sequences. I’ll choose the evening’s targets and timing around the actual sky and conditions, then confirm that both timelapse cameras are recording their nighttime views. | |||||||||||||||
| Step 15Image through the night | Once the sessions are running, I’ll make periodic checks of image quality, tracking, dew, power, and storage. I’ll keep movement around the tripods to a minimum and use the marked paths when moving between the control area and the instruments. I also want time to enjoy the sky directly. That may mean visual observing with PiNG if it comes along, or simply stepping back from the screens while the four imaging rigs work. Warm clothing, food, and rest are part of making that a comfortable night. | |||||||||||||||
| Step 16Back up, rest, and prepare for the next night | Each morning, I’ll stop and save the sessions, then use the laptop and portable hard drives to back up the imaging data and both cameras’ footage. I’ll organize files by night and instrument, check that the copies are readable, and retain the originals wherever practical. Processing can wait until I’m home. The rigs will stay in their established positions between nights when conditions allow. I’ll park and power down equipment as appropriate, protect it for the daytime conditions, and deal with moisture before covering or enclosing it. I’ll check the weather, replenish power and storage as needed, and give myself time to rest. Breakfast and a hot drink are part of the plan too. I’m considering a compact single-serving Keurig and a small electric griddle for coffee, hot chocolate, eggs, or pancakes, provided their use is permitted and suitable power is available. I’ll also bring food and drinks that don’t depend on field electricity, along with water, cooler supplies, utensils, and cleanup materials. Before the second—and, if conditions support it, third—night, I’ll inspect the site, uncover the instruments, and repeat the dusk checks for alignment, focus, framing, dew control, and recording. Leaving the rigs in place should reduce the daily setup work, while these checks will catch anything that shifted or changed. I’ll capture any replacement calibration frames needed after configuration changes. | |||||||||||||||
| Step 17Pack down on the final day | At the end of the stay, I’ll capture any remaining configuration-dependent calibration frames before dismantling the relevant setup. I’ll shut down the instruments, verify the trip’s data backups, and pack optics and electronics into their assigned cases. I’ll let damp equipment dry where conditions allow and keep anything still wet separate for drying later. Then I’ll remove the branch cables and power boxes, dismantle mounts and tripods, and pack the support hardware. The table, tent, tarp, stakes, and markers will follow. I’ll disconnect and pack the main power line once it is no longer needed. My final walkthrough will be for small parts, stakes, rubbish, and anything left on the ground. I want to leave with the field clear, the equipment accounted for, and a complete record of the trip—from building the camp to the images it helped me capture. |
Current shopping list
These are the purchases and supplies I’m planning around. For items that may already be covered by my existing gear, I’ll check what I have before buying anything else.
| Item | Purpose and buying decision |
|---|---|
| Glow-in-the-dark gaffer tape | For the compass on the positioned tarp; I’ll test adhesion, removal, and nighttime brightness before committing to the full design. |
| Small red cones and dim red electric tea lights | Cable and trip-hazard markers; brightness and visibility need an outdoor night test. |
| Removable red screen film for the iPad | For the field display setup, checked together with screen brightness in darkness. |
| USB hub for the MacBook Air | For connecting both smart telescopes (S50 and S30 Pro), multiple external hard drives, and potentially a planetary camera attached to the 6SE. I want enough data ports for these devices together, with power, bandwidth, and Mac compatibility checked before choosing a hub. This will support trip backups and continued use at home; the possible 6SE camera connection is a longer-term use case, not an addition to the trip’s imaging lineup. |
| Tarp, suitable stakes, and mallet | The ground layout and tarp/tent anchoring kit; I’ll confirm what I already have and fill any gaps. |
| Compact single-cup Keurig | An optional purchase once permitted use and suitable power are established. |
| Molebt custom-fit cover for the MINI Cooper Hardtop 4-Door F55 | The version with a driver-door zipper and mirror pockets, for my 2015 MINI. I’ll use it for vehicle protection and as an additional light shield, then test unlocking, driver-door access, rear-hatch access, and locking during the backyard rehearsal. Blackout performance is unverified; I’ll still disable or shield lights that escape through the fabric or openings. |
| Small electric griddle or cooktop | An optional breakfast setup, subject to the same location and power checks. |
| Folding table | A stable control and work surface; I’ll confirm whether an existing table suits the trip before buying one. |
| Cooler and ice | Food and drink storage for two to three nights; I’ll confirm cooler capacity and arrange ice. |
| Food, drinking water, coffee/hot-chocolate supplies, and cleanup supplies | Enough for the planned stay, including meals and drinks that don’t require electricity. |
| Any gaps found in the final equipment check | Cables, adapters, power supplies, dew-control accessories, pavers/pads/ballast, or bedding only where the complete trip setup actually needs them. |
The tent and inflatable mattress are already part of the camp setup, the chair is selected, and the headlamp is already included. The laptop and portable hard drives are coming for backups; they are packing items, with no new purchase assumed. WideSky and WiNG are operational, so earlier ideas about buying equipment to get those rigs working are no longer the basis of this shopping list.
Questions I’m still working through
The overall imaging lineup is settled. The remaining questions are mostly about making the whole camp comfortable, reliable, and easy to use for several nights.
| Question | What I want to establish |
|---|---|
| Two nights or three? | How the forecast and actual conditions shape the length of the stay and the imaging opportunities. |
| What stays deployed between sessions? | The daytime protection and moisture-management arrangement for leaving the rigs in position, and the conditions that would prompt me to pack equipment away. |
| Does PiNG come along for visual observing? | Whether its observing value justifies the extra space and setup, with a complete visual configuration that doesn’t borrow equipment needed by the imaging rigs. |
| Which ground-support arrangement works best? | How the tarp, pavers, vibration pads, and ballast work together without transferring movement or creating awkward walking routes. |
| How well does the compass tape work after dark? | Whether the glow is useful and unobtrusive, whether it is acceptable for the observing field, and how I’ll cover it if necessary. |
| Are the cable markers and screens dim enough? | How the red cones, tea lights, displays, and tent lighting look from neighboring observing positions. |
| Can I use the Keurig or griddle, and where? | Permitted locations and times, available electrical capacity, and a suitable appliance setup. I’ll also check whether the vehicle inverter is a practical, permitted alternative before relying on it. |
| Does the complete power arrangement support everything together? | The simultaneous load of four imaging rigs, dew control, networking, cameras, and field electronics, with every supply and cable assigned. |
| How does the complete hotspot setup perform? | T-Mobile reception was adequate during my daytime visit. I’ll check simultaneous device connections, reconnection, and the local-control fallback if service drops. |
| Will dew control and calibration hold up through the stay? | Overnight heater performance, the filters and framing I’ll use, and when changes would require fresh calibration frames. |
| Can both timelapse cameras cover the intended sessions? | Starting power, overnight endurance, storage, and the transition from setup footage to nighttime recording. |
| Is the backup workflow ready for several nights of data? | USB hub connectivity with both smart telescopes and multiple external drives, available power and transfer bandwidth, drive capacity, transfer cables, copy verification, and keeping originals until the backups are checked. |
| Is the sleeping and food setup comfortable for the full stay? | Mattress inflation and air retention, insulation, bedding, tent access, cooler capacity, meals, and hot-drink arrangements. |
| Does it all fit and deploy in the intended order? | The vehicle load, first-out recording kit, labeled instrument kits, and enough room to transport everything without a last-minute reshuffle. |
The backyard rehearsal will help me answer these practical questions before I take the complete setup into the field.